Manually extracting LMS (Learning Management System) reports is both time-consuming and prone to errors. Automating the process to save LMS email reports directly into Google Sheets saves time and keeps data up-to-date. This guide will walk you through extracting LMS reports, emailing them, and automatically saving them to Google Sheets.
The Challenge of Manual LMS Reporting
LMS platforms generate a wealth of valuable data, but getting those insights into a usable format is often a hassle. Reports are usually sent via email as CSV or Excel files, requiring manual downloading, cleaning, and uploading. This process:
🚫 Wastes valuable time on repetitive tasks
🚫 Increases the likelihood of human error
🚫 Delays data-driven decision-making
One of our clients, a mid-sized enterprise managing thousands of training completions each month, struggled with tracking compliance due to inconsistent report updates. Their team spent hours each week manually transferring LMS reports into spreadsheets for analysis.
To eliminate this inefficiency, we automated the entire process—from email inbox to Google Sheets—allowing training teams to focus on insights rather than data wrangling.
Set Up Scheduled LMS Email Reports
Most LMS platforms (like Cornerstone OnDemand, Docebo, and Workday) allow users to schedule automated email reports. Here’s how to set it up:
- Go to the LMS Reports section (e.g., Reporting 2.0 for Cornerstone OnDemand)
- Select the fields necessary for the end goal (training title, training type, transcript status, learner name, learner email, learner position, etc)
- Schedule the report to be sent to a designated email address with no header/filter section (i.e. the column names of the table should be the first row)
- The frequency of report delivery is crucial for maintaining data freshness. For reference, typical learning data processes refresh daily.
- Ensure the report is in Excel format. While CSV files are smaller, converting them to Google Sheets format is more complex than using Excel files.
Go ahead and schedule the email report. To test immediately, manually trigger the LMS to send a report.

Create an account with an automation tool
There are several leaders in the no-code automation tool space with Make, n8n, and Zapier at the top right now. For this demonstration, we will use Make for its generous free plan.
Create a new Scenario
Here is Make's documentation on how to create a scenario. To simplify the next steps, import the workflow blueprint by clicking 'More' on the bottom toolbar, selecting 'Import blueprint,' and uploading this file. Otherwise, follow the steps below to recreate the flow.
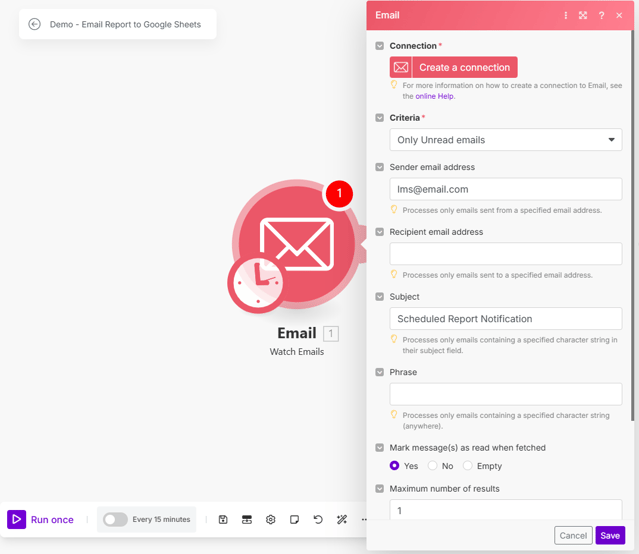
Add a Watch Emails module with the necessary settings to find your email reports in the future (and only your email reports)- If this is your first time using Make, you'll need to create a connection to the email account receiving the reports. It will ask you to sign in and allow Make to have the permissions to access the email account.
- Leave all of the defaults other than the following:
- Folder --> INBOX
- Select your inbox unless you have a specific folder you have the email reports going to.
- Criteria --> Only Unread emails
- This will allow us to not look at previously sent reports.
- Sender email address --> Add the email address in the "From" line of the email you sent from the LMS earlier
- Subject --> Grab this from the email subject of the report
- If the subject includes a date or time, exclude it when entering the subject in this field. For example, if the subject is "Scheduled Report Notification 2.12.2025", you would only want to add "Scheduled Report Notification" to the Subject field in this Make module.
- Mark message(s) as read when fetched --> Yes
- This will let you (and Make) know that the report has been processed.
- Folder --> INBOX

Add a Iterate Attachments Email module
- Source Module - It should default to the Watch Emails module.

- Update the connection (if needed - similar to the email account)
- Enter a Folder ID --> Select from the list (unless you know the Folder ID)
- New Drive Location --> Select My Drive unless you know it needs to go to a different location
- New Folder Location --> Select the folder you would like the reports to go
- We recommend creating a dedicated folder for reports. If needed, you can organize folders by LMS to match your organization's structure.
- File --> You can keep this as the "Email - Iterate Attachments" unless you would like to update the file name before it saves to Google Drive.

Update the Schedule setting (This should be based on the schedule you set within the LMS for report generation frequency.)
- Run scenario --> Daily
- Time --> 12:00 PM (This time should be at least 10-15 minutes after the LMS email report is scheduled to send to allow time for the LMS to generate the report.)
Activate the Scenario
There you go! Your LMS reports will now be automatically saved to Google Drive and, consequently, Google Sheets..
Take the Next Step with Learning Data and Reporting Services Provided by Lernevate
- Learn More: Discover how our team can help bring your data to the forefront of your organization here.
- Get in Touch: For further details and support, visit us at https://lernevate.com/contact-us. We’re here to help you enhance your learning and development data efforts.
Tags:
Reporting and Automation


Comments